SHIELD v2 -> v3 Upgrade Instructions
This is a guide to assist users with the upgrade process from SHIELD v2 Core wallets to v3, due to the network-wide codebase upgrade that took place in early July 2018.
SHIELD v3 is a complete upgrade of SHIELD, bringing the SHIELD codebase up-to-date with Bitcoin Core 0.16.1. This brought a multitude of improvements to SHIELD, including Segregated Witness, better peering, and hierarchical deterministic wallet support, among many other things.
Note: Please note that SHIELD v2 and SHIELD v3 share the same data folder. This means that:
You should not need to relocate the
wallet.datfile during the upgrade.You may wish to delete residual data to save some space in your data folder.
These files and folders are safe to delete (take care not to delete anything else!):
the
txleveldbfolder and its contentsthe
databasefolder and its contentsthe
blk0001.datfile (NOT inside theblocksfolder!)
These files are safe to delete before the upgrade, but please don't delete them afterwards:
the
peers.datfilethe
db.loganddebug.logfiles
For Users
Migrating from v2 Core to v3 Electrum (casual users on Windows)
This will move your coins to your Electrum wallet in an one-way manner. The coins are sent to the Electrum wallet across the SHIELD network, and will move from your old address to your new one.
In the v2 wallet, go to the menu bar in the top-left corner, and choose
File -> Backup wallet, and save the resulting.datfile somewhere safe. This is your wallet data, and while its coins will be moved once you complete these steps, it's still recommended that you keep this file as a backup.Now to start the coin migration process, go to
Help -> Debug window -> ConsoleEnter the command
listaddressgroupingsto see all your coins, and the specific addresses that "hold" them.For each address that you want to migrate to the Electrum wallet, enter the command
dumpprivkey ADDRESS, whereADDRESSis a single address. You may need to enter this command multiple times - once for each address.You will receive a private key for each address (an example:
VS1fK1j4Yj7dGMx2tPBvK2F4PsFaRsAxAi4bw329DKFDEvCX2iv). Note these private keys down somewhere (e.g. in a Notepad window), as you will be using them to move your coins.Now download the Electrum wallet, and set up a wallet, as per these instructions. Once you see the main Electrum wallet interface with the various tabs like
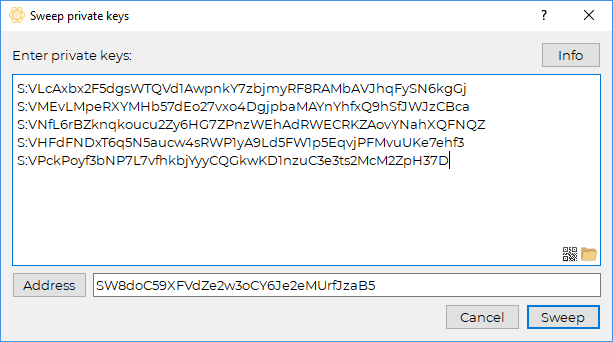
History,Sendetc., you can proceed with step 7.Choose
Wallet -> Private keys -> Sweep(pictured below) Now enter each of the private keys you obtained earlier in step 3 on a new line in the input box with the prefix
S:, as shown in the image below. Then hitSweep. Note: at this stage, your coins still remain unmoved.If SHIELD funds were successfully found with your private keys, you should now see a pre-made transaction in the
Sendtab, paying to an address in your Electrum wallet. Proceeding and hitting theSendbutton will irreversibly move the funds from your old wallet to your new Electrum wallet.
Congratulations! You should now see your new imported balance, ready for use.
Migrating from v2 Core to v3 Core (other users)
Please make sure you have at least 1 recent backup of your
wallet.datfile in a safe place, and that the previous SHIELD v2 client is closed. You can back this file up in one of two ways:Go to the top-left corner of the SHIELD v2 client, and choose
File -> Backup wallet, and save the resulting.datfile somewhere safe, orClose the wallet, and go to the wallet's data folder and copy the
wallet.datfile from there, and paste it somewhere safe.
Download the relevant binary for your operating system.
If you have previously used Tor nodes with your QT wallet, you will need to change your
SHIELD.conffile and change thetor=line toonion=. If you have not used them, or do not know what they are, skip this step.(optional): Use the bootstrap to synchronise your wallet faster.
Open the Core wallet binary (
shield-qt) and wait for header and block synchronisation to complete.
For Exchanges
Backup the
wallet.datand theSHIELD.conffiles from the data folder.Clear the contents of the data directory except for
SHIELD.confandwallet.dat.Clone the source code and compile, or download the relevant binary for your OS.
Please make some changes to the
SHIELD.confconfiguration file, located in the data folder:Change any
tor=lines toonion=.Remove any
gen=lines.(optional) To create the old
S-prefixed addresses, add the lineaddresstype=legacy. ScriptE-prefixed addresses are otherwise the default.(optional): To call certain “legacy” rpc functions, you may need to add the line
deprecatedrpc=accounts
(optional): Download and extract the bootstrap to synchronise your daemon faster.
Open the binary and wait for the headers and blocks to sync automatically.
For Pools
Backup the
wallet.datand theSHIELD.conffrom the data folder (note: pools that host multiple SHIELD algorithms may have specified their own custom paths).Clear the contents of the data folder(s) except for
SHIELD.confandwallet.dat.Clone the source code and compile, or download the relevant binary for your OS.
Please make some changes to the
SHIELD.confconfiguration file, located in the data folder:Change any
tor=lines toonion=.Remove any
gen=lines.Make sure there is an
algo=line inSHIELD.conffor the chosen algorithm for this daemon's stratum; the choices arex17, scrypt, myr-gr, lyra2v2, blake2s, x16s.(e.g.
algo=x16s)
For YiiMP pools that are not yet on the latest YiiMP source code, please add the line
addresstype=legacy, otherwise mined funds may be lost!YiiMP pools require the line
deprecatedrpc=accountsfor normal functioning. (This may also apply to non-YiiMP pools.)
YiiMP pools that hosted the v2 client required
Daemon > RPC typeto be set toPoS. This setting needs to be changed toPoWfor SHIELD v3. (This may also apply to non-YiiMP pools.)YiiMP pools should enable the following settings on the daemon config page:
Settings -> Has getinfoSettings -> Use segwit
(optional): Download and extract the bootstrap to synchronise your wallet faster.
Open the binary/binaries and wait for the headers and blocks to sync automatically.
Last updated