Paper Wallet Guide
Introduction
The Paper wallet is ideal for those that want to receive SHIELD, but not necessarily send it in the short term. You can generate an address while keeping the private key needed to spend the funds offline, on a USB stick for example.
This way, you minimise the potential risk of wallet theft from viruses and other online threats, but are limited in not being able to spend it without importing it into another wallet first.
Getting Started
Setting up the wallet
Firstly, there are two ways to run the Paper Wallet Generator.
You can run it straight off the website, or
You can download the whole page to your computer from here (hit the green
Clone or downloadbutton, and thenDownload ZIP), and runindex.htmlin a browser.
Downloading it, disconnecting your computer from the Internet, and then running it (in a secure environment like a Linux Live CD) is the recommended way.
This way you can inspect the source files if you like, and you can be quite sure that your private keys are being generated properly, and are not transmitted over the internet.
However, you can also run it straight off the website if you like, for convenience.
The choice is yours!
To generate your paper wallet key pair, please move your mouse around the page. This will generate some randomness, which will in turn increase the security of your Paper wallet.
After you have generated enough random bits, you will see your
Public Addressand yourPrivate Key (Wallet Import Format). You can technically stop here, and use this address to receive payments, and save this private key somewhere offline (e.g. USB stick, etc.) to move your coins at a later date. If you want to print it out on a piece of paper (and possibly laminate it, etc), then please continue with Step 3.Copy the
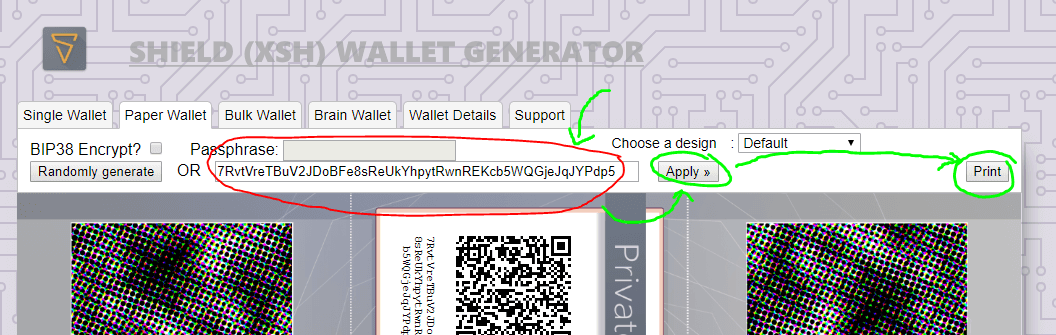
Private Keystring (the long string of numbers and letters underneath the Private Key QR code, starting with the number7).Along the top row, you should see the tab
Single Walletselected. Please select thePaper Wallettab now.(pictured below) Paste your copied private key into the
Enter your own WIF private keybox, and hitApply >>, thenPrint.Adjust your relevant print settings, and then print your Paper wallet.
Go to the
Single Wallettab and follow the steps for folding your new paper wallet.
Paper Wallet Usage
Sending SHIELD from your Paper wallet
Please see this section to import your Paper wallet into the Electrum wallet.
Or see this section to import your Paper wallet into the Core wallet.
Please note that after you do this, you should discontinue using your existing Paper wallet.
After you import your Paper wallet, you will be able to spend and receive funds with the Electrum wallet as per the Electrum Wallet Guide, or the Core wallet as per the Core Wallet Guide.
Last updated