Electrum Wallet Guide
Introduction
The SHIELD Electrum wallet is a lightweight, easy-to-use alternative to the Core wallet.
It's local, secure, and lets you control your funds just like the Core wallet, but without needing to participate in network block validation and store a copy of the blockchain, which is less reasonable for those with network bandwidth restrictions and/or lighter, less powerful computers. However, it relies on centralised servers to send and receive coins, which may be both a pro and a con for some users.
The Electrum wallet is recommended for all casual, everyday users.
Editions
There are three editions of the Electrum wallet - the recommended version for Windows users is the "Setup" edition.
Functionality-wise, they are all identical. They differ only in the location they store their data, and in their install method. The differences are shown below.
Installs SHIELD Electrum onto the computer, into Windows'
Program Filesdirectory. This means you can remove the setup file after setup is complete.This edition saves wallet information into the user's internal data folder.
Shorthand path:
%appdata%\Electrum-XSHFull path:
C:\Users\<username>\AppData\Roaming\Electrum-XSH
Ideal for everyday use and easy access from the Start Menu etc.
Getting Started
Links
Source code: GitHub Latest binary releases: GitHub
Setting up the wallet
(for Windows):
Firstly, please choose your preferred edition, and then download it here.
If using the Setup edition, please install it, and then open "Electrum-XSH".
(for Linux or Mac):
Please download the source code, install required dependencies, and run
electrum-xsh
You should now see the Install Wizard. This is the setup process to create your wallet. Press
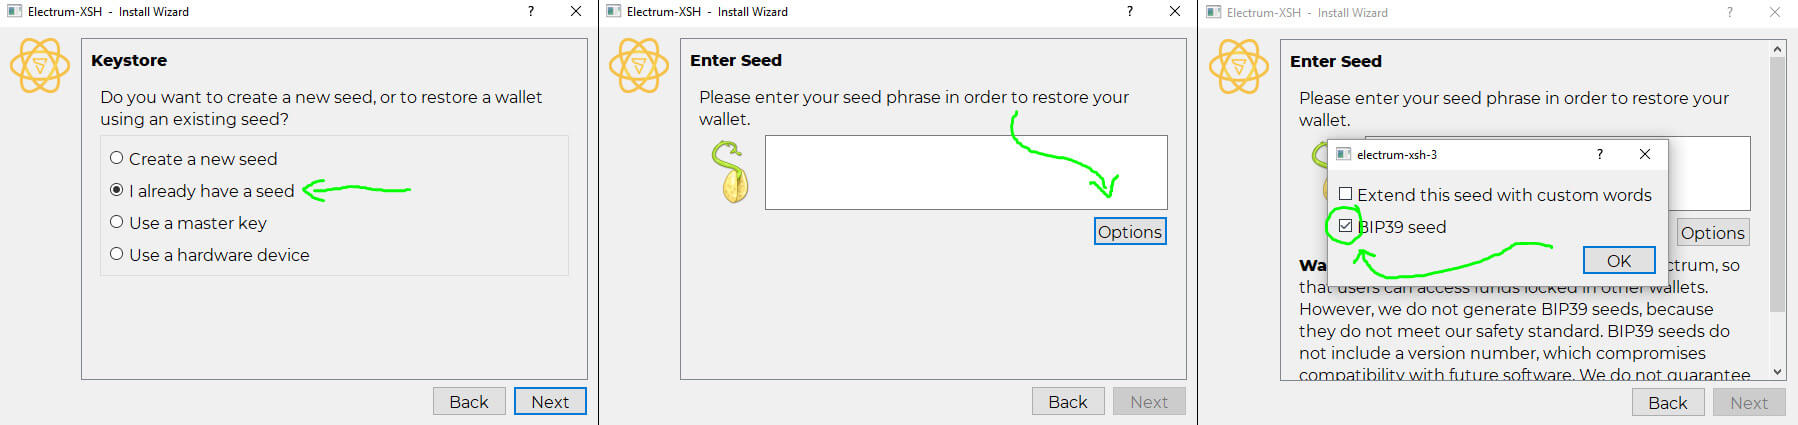
Nextto proceed.When asked which kind of wallet you want to create, choose
Standard wallet.When asked about a seed, choose
Create a new seed. If you are a user of the old Electrum wallet, please chooseI already have a seedinstead, and restore your wallet with your previous seed.For the seed type, choose
Standard. You may chooseSegwitif you like, but it is less compatible with some exchanges and merchants, so it is not recommended at this time.You will now see 12 words, which you should write down on paper (and maybe laminate). Keep your seed somewhere safe, where you will not forget. Whoever knows your seed has full access to the coins you will store in your Electrum wallet. The current wallet page itself shows a similar warning.
You will now be asked to type your seed into the white box, to make sure that you have written it down correctly.
You can set an optional password which will encrypt your wallet file. This password will be required whenever you start up your Electrum wallet in the future.
Your new Electrum wallet is now ready for use!
Electrum Wallet Usage
Receiving SHIELD
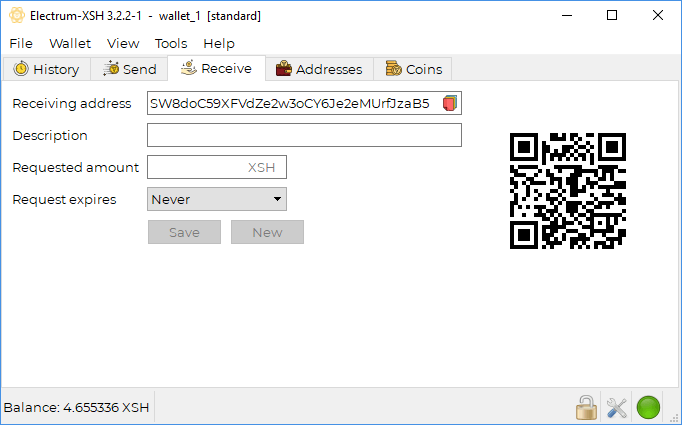
To begin receiving SHIELD with the Electrum wallet, please start by choosing the Receive tab.
Your newest address is shown in the field
Receiving address. You can give this SHIELD address to people directly, and you can start receiving SHIELD with it right away.
The other fields are completely optional, but you can fill them in and continue to make a full (and optionally signed) payment request.
Full payment requests are not yet in common use and are not fully compatible with all wallets, so are not recommended.
Sending SHIELD
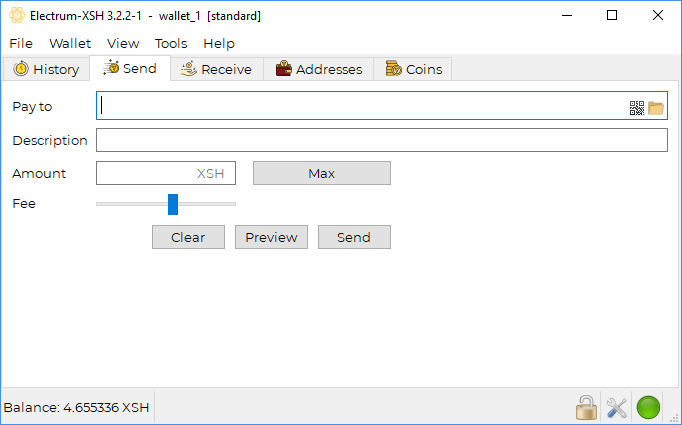
To send SHIELD with the Electrum wallet, please start by choosing the Send tab.
Fill in the
Pay tofield with your desired destination address.(optional) You can fill in a description for the transaction here, which is stored locally (not sent to the network) and can be used to help you keep track of where and what a transaction was for.
Fill in the
Amountfield with the number of SHIELD you want to send.Press
Sendto send your coins across the network!
Wallet Backup
Keeping a backup of your wallet is very important!
There are two main ways to back up your Electrum wallet.
Both ways will allow you access to all of your coins, but Method B allows you to save some extra optional data, and allows encryption for safer backup storage.
(We recommend using Method A for being easy to write down on a piece of paper.)
Method A) Seed backup
Your recovery "seed words" are used as a base, which the wallet uses to generate all past and future keys. This allows you full access all the coins held by that wallet (regardless of address) by simply re-entering these words.
In the Menu bar, choose
Wallet -> Seed.Write down the shown seed words in a safe place, in the exact order they appear.
To restore your seed later, simply choose I already have a seed during the Electrum wallet setup wizard (File -> New/Restore).
If your Electrum wallet was imported from an Android wallet seed, the Electrum wallet will not show you your seed words. Please keep your original seed words backed up, and/or use Method B!
Method B) Wallet file backup
This method saves not only all your coins, but also your transaction descriptions and other custom data. You may also encrypt this file with a password (Wallet -> Password), for safer storage.
In the Menu bar, choose
File -> Save copy.Choose a location to save your wallet file.
Keep in mind that if your wallet is encrypted with a password, this file will also require that password to open it. To restore this wallet at a later time, choose File -> Open in the Menu bar, and choose the wallet file that you saved.
Troubleshooting Q&A
Q) I try to run the Electrum wallet on Windows, but I get ".dll missing" errors?
A) Please try installing this, and try again.
Importing another wallet
Importing Paper Wallet private keys into Electrum
WARNING: We recommend you to never re-use your paper wallet once it has been imported.
Download the Electrum wallet here.
Create a new seed.
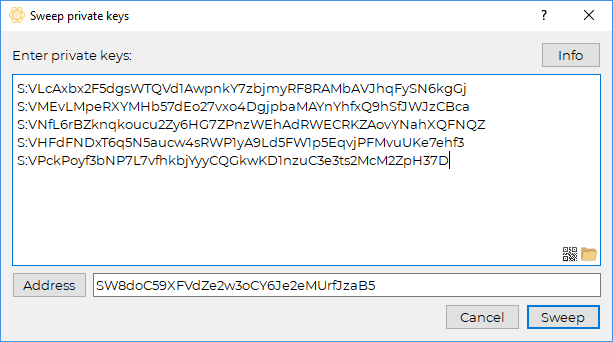
In the Menu bar, choose
Wallet -> Private keys -> Sweep(pictured above) Enter your Paper wallet private key(s) in the box in the format:
S:KEY, whereS:should be typed as-is, andKEYis one private key. Add more lines for multiple private keys (i.e. multiple paper wallets).for example:
S:VS1fK1j4Yj7dGMx2tPBvK2F4PsFaRsAxAi4bw329DKFDEvCX2ivThe address shown at the bottom is where the coins will be sent during import; this address belongs to you, in your Electrum wallet.
Hit
SweepIf your Paper wallet held coins, you will now see a premade transaction in the Send tab. Press
Sendto finish importing your coins from your Paper wallet to the Electrum.
Congratulations! You should now see your new imported balance, ready for use.
Importing Android Wallet seed into Electrum
The current version of the Android wallet was deprecated with the release of SHIELD v3.
Users who had funds stored on the Android wallet prior to the release of SHIELD v3 can import their funds into the Electrum wallet for use/storage etc.
If you cannot remember, or have otherwise misplaced your recovery seed, go to your Android wallet, press the "three dots" button in the upper-right corner, then select Settings -> Show recovery phrase.
If you are using the Electrum wallet for the first time, it will start with the wallet creation wizard. If you have used it before however, you will need to choose
File -> New/Restorein the menu bar in the upper-left corner, to start the wizard manually.When the wallet asks you what kind of wallet you want to create, choose
Standard wallet(pictured above) Then choose
I already have a seed(pictured above) Choose the
Optionsbutton, and checkBIP39 seedYou should now enter your Android wallet recovery seed, and hit
Next.For script type, choose
legacy (p2pkh). For derivation path, please leave it unchanged from the default.(optional, recommended) Choose a password to encrypt your new local wallet.
Congratulations! You should now see your Android wallet's balance, ready for use.
Last updated